|
Remove the Spare Tire
|
|
|
Unscrew the bolt that holds it in the center.
|
|
|
|
Remove the Passenger Side Cargo Tray
|
|
|
|
|
|
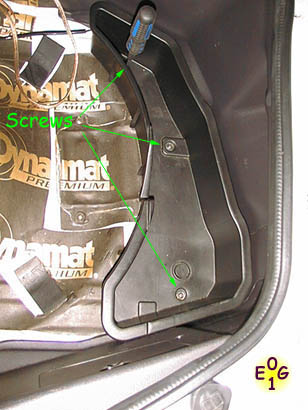
There are three black screws that hold the plastic tray to the trunk floor.
|
|
|
|
Remove the Fuel Pump Access Panel
|
|
|

|
|
|
Remove the four screws that hold the fuel pump access
panel to the trunk floor. If you've never done this before
or if you live in an area that uses salt on the roads,
these screws may be rather hard to loosen. Be careful
not to strip them.
|
|
|
|
Disconnect the Fuel Pump Wiring Harness
|
|
|

|
|
|
Squeeze the tab and pull it off. The idea here is that by disconnecting
the power to the fuel pump and trying to start the car, the injectors will bleed
out the fuel in the rails and feed lines until there is little or
no pressure in the lines. This makes it safer to disconnect these high-pressure
fittings.
|
|
|
|
Start the Engine
|
|
|
If it turns over, it will die within a few seconds
as it runs out of fuel. If the car hasn't been
started in a while, it may not turn over at all.
In this case, just crank it with the starter for
about 10 seconds and call it good.
|
|
|
|
Reconnect the Fuel Pump Wiring Harness
|
|
|
|
|
|
You should feel a click when it's securely attached.
|
|
|
|
Reinstall the Fuel Pump Access Panel
|
|
|
|
|
|
Same four screws.
|
|
|
|
Reinstall the Passenger Side Cargo Tray
|
|
|
|
|
|
Almost done in the trunk...
|
|
|
|
Reinstall the Spare Tire
|
|
|
Good time to check the pressure in the spare - it should be 60psi.
|
|
|
|
Remove the Battery Terminal Connections, Battery Tie-down Bar, and Battery
|
|
|

|
|
|
Disconnect the negative and positive terminals from the battery posts.
ALWAYS, ALWAYS, ALWAYS, disconnect the negative terminal first!!!
I have a socket wrench from when I was 16 that has part of the frame of my
first car WELDED to it because I didn't know to take the negative terminal
off first. Lots of sparks, battery on fire, and other bad things. But I
digress... remember that when the negative terminal is connected, the ENTIRE
chassis of your car (including all the metal parts) is one big GROUND.
The stock terminals use 8mm nuts; I have an aftermarket negative terminal
on my car that uses convenient wing-nuts. A couple of bucks well spent.
Using a 10mm wrench or socket, completely remove the battery
tie-down bar so that the battery can be removed. Carefully lift the battery
out of the car and place it in a safe place out of the way.
|
|
|
|
Remove Battery Tray and Washer Fluid Reservior
|
|
|

|
|
|
Remove the four 12mm bolts at the corners of the battery tray so that
you can lift it out of the way. You may leave the two more central
bolts attached as they attach the washer fluid reservoir to the battery
tray. As you will see, the washer fluid reservoir has hoses and a wiring
harness attached to
it, so if you want to save some time, simply place the washer fluid reservoir
and battery tray assembly out of the way, but leave the hoses attached.
Be careful not to scratch the paint on your fender if you do this!
|
|
|
|
[optional] Remove Battery Tray Bracket
|
|
|
At this point, you can remove the bracket that supports the battery
tray if you'd like some extra room. There are two 12mm bolts along
the bottom if you decide to remove it.
|
|
|
|
[optional] Remove Intake Pipe
|
|
|

|
|
|
*Updated 06/16/03* I'll leave this step here
for documentation, but having done this a few more times
now on different cars, you probably don't need to do this. My
recommendation is to attempt the job without this step and
only do this if you find you need the extra space.
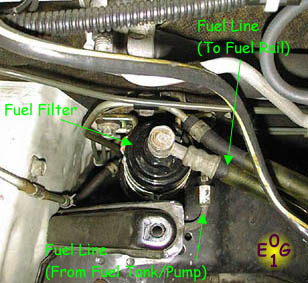
You will now be able to see the fuel filter on the firewall behind
where the battery was. You may be able to change the fuel filter
without this step, but you'll probably value any extra working space
you can get! You only need to remove the portion of the pipe that
extends from the throttle body to the first joint (near the MAS).
The stock hose clamps use 10mm bolts. For turbo cars, you'd be
removing the y-pipe instead of the pictured pipe. Be sure to remove
the breather hose when you remove the pipe (it's the little 3/8" ID hose
that goes from the rear valve cover to the nipple on the intake pipe).
|
|
|
|
Remove Lower Fuel Pipe Connection
|
|
|

|
|
|
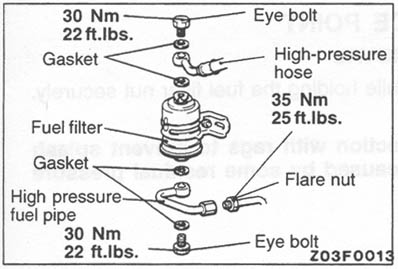
The service manual says to remove the "U" shaped pipe that turns
the fuel line around when it leaves the filter(toward the front
of the car) and heads back toward the main fuel line. I could not
loosen that fitting for the life of me. I ended up removing the
bottom bolt on the fuel filter without removing the pipe, just had
to be careful not to lose the gaskets.
Updated 06/16/03: On my new VR-4 I actually had problems
getting the lower fuel filter fitting off, so I used a flare nut
wrench (line wrench) on the fitting on the "U-pipe" and I managed
to get it off. I'll check the size next time I'm in there,
but I think it was a 14mm flare fitting.
Thanks to Kris Hartwell for this suggestion!
Have your safety goggles on at this point, and place some shop towels around/below
the filter so that any gasoline that sprays/leaks out will not go everywhere.
Also, if you've never changed your fuel filter before, you may want to
remove the upper connection first so you can see which parts move and which
parts don't move. You'll be turning the bolt in the top of the filter,
NOT the black neck of the filter!
This is where the fun starts! Be sure you're turning the bolt the correct way (remember,
it's upside down). You'll need two wrenches (19mm or 3/4") If you don't have two of the same
wrenches, a 19mm and a 3/4" will work. Use the closed end on the bolt and grab the neck of the
fuel filter with the open end of the other wrench. There's no room for a breaker bar
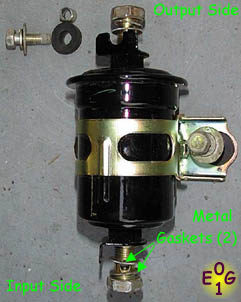
in there, so you make sure you ate your Wheaties this morning. You will probably bleed
after this step... and don't lose those 2 metal gaskets that go around the fuel connection!
Installation Tip: Instead of lining up the wrenches the way I show
them in the picture, use a 12-pt closed-end wrench and place it so that the
wrench sticks out to the right (looking from above) of the wrench
that is on the neck of the fuel filter. Then you can just grab both wrenches
with both hands and squeeze to break the bolt free. Again, thanks to Kris
for this tip!
|
|
|
|
Remove Upper Fuel Pipe Connection
|
|
|

|
|
|
When you've made it this far, it's all downhill from here. Thankfully,
the upper connection is much easier than the lower one! Remove the upper
fuel connection the same way you did the lower one, and remember those gaskets!
You can optionally use a 19mm socket on the upper banjo bolt if that makes it
easier for you to remove it.
|
|
|
|
Remove the Fuel Filter
|
|
|

|
|
|
Remove the two 12mm bolts that hold the fuel filter bracket to the firewall.
After they are removed, the you will be able to remove the filter (finally!)
|
|
|
|
Disassemble the Fuel Filter Bracket
|
|
|
|
|
|
Remove the bolts, metal sleeves, and rubber spacers from the old fuel filter
bracket as you will need to reuse them when you install the
new fuel filter.
|
|
|
|
Assemble the New Fuel Filter and Bracket
|
|
|
|
|
|
Reassemble the same way you took the old one apart.
|
|
|
|
Install the New Fuel Filter
|
|
|
|
|
|
Bolt it to the firewall with the two 12mm bolts.
|
|
|
|
Connect Upper Fuel Pipe Fitting
|
|
|
|
|
|
Thread the banjo bolt (a.k.a. eye bolt) through the fuel line fitting
and into the new fuel filter. Turn the opposite way from what is
shown in the picture (picture is for removal).
Make sure you put the metal gaskets on both
sides of the fuel line fitting. I think you can technically reuse
these gaskets, but since they're cheap, I usually just replace them.
The torque spec is 22 ft*lbs (30N*m), and you should be able to get
a torque wrench on this fitting if you choose to use one.
|
|
|
|
Attach Lower Fuel Pipe Connection
|
|
|
|
|
|
Much the same as the upper connection, except that I don't think there's any way
you're getting a torque wrench in there. You'll have to guestimate
based on your prior experience. Again, turn the opposite way from what is
shown in the picture (picture is for removal).
|
|
|
|
[optional] Reinstall Intake Pipe
|
|
|
|
|
|
Only if you removed it...
|
|
|
|
[optional] Reinstall Battery Tray Bracket
|
|
|
Only if you removed it...
|
|
|
|
Reinstall Battery Tray and Washer Fluid Reservior
|
|
|
|
|
|
It should just drop right back in. Make sure you reattach the water hoses
and sensor wiring harness if you removed them.
|
|
|
|
Reinstall the Battery Terminal Connections, Battery Tie-down Bar, and Battery
|
|
|
|
|
|
Just reverse the way you took them off. Make sure you attach the positive
terminal of the battery first.
|
|
|
|
Clean Up Any Mess You Made
|
|
|
Make sure you wipe up any gasoline that dripped under the car.
|
|
|
|
Start the Car
|
|
|
It may take a few seconds of cranking due to the lack of fuel pressure,
but she should fire right up.
|
|
|
|
Check For Fuel Leaks
|
|
|
Use your eyes, ears, and nose (preferably not your fingers) to check
out the area around the fuel filter to ensure you have no leaks.
The fuel system should maintain about 30psi if you shut it down
while idling - that should be enough pressure to make an audible
hissing if there is a leak. If you did everything right, there
is no leak. Go drive your car.
|