|
Clear Out Area Near Transaxle Mount
|
|
|

|
|
|
You'll need to remove the battery, the washer fluid tank, and the support
bracket for the washer fluid tank. If you don't remember how to do this, check
out the Fuel Filter Page as it
involves these same tasks.
|
|
|
|
Support Transaxle
|
|
|

|
|
|
Support the transaxle from underneath it so that there is no weight on the
mount. I used a floor jack with a small block of wood on the transaxle
case. If you're not sure when the mount is unloaded, have a friend watch the mount
while you slowly jack it up, and when you first see the rubber and cross pin move,
that's it.
|
|
|
|
Break Cross Pin Bolt Free
|
|
|

|
|
|
Fit a closed-end 17mm wrench on the forward-facing side and a 17mm socket on the
rearward-facing end. You may find that a cheater bar is helpful here.
|
|
|
|
Remove Cross Pin Bolt
|
|
|

|
|
|
Don't loose the nut or lockwasher!
|
|
|
|
Remove Mounting Bolts
|
|
|

|
|
|
here are four 14mm bolts that secure the transaxle mount to the chassis. They
are accessible via holes in the passenger's side wheel well after you remove the
rubber plugs that cover the holes. Using an extension and a universal joint (upper
left bolt), remove the bolts. On the last bolt, be careful to support the transaxle
mount, because that will be the only thing holding it in the car. Note that it's much
easier if you remove the passenger's side front wheel, even though I hadn't done this yet
when the picture was taken.
|
|
|
|
Remove Transaxle Mount
|
|
|

|
|
|
That's it - it should be complete free now. Carefully remove it from the engine bay.
|
|
|
|
Examine Old Mount
|
|
|


|
|
|
Here's my old one - you can see it had several cracks in it, was missing a small chunk of
rubber, and was leaking. Not particularly good, though it seemed to be able to
do its job for the most part.
|
|
|
|
Compare Old and New Mounts
|
|
|


|
|
|
Make sure you've got the correct one. New OEM mount shown, but the
3SX mount should look basically the same, except for the material in the
center will be polyurethane instead of rubber.
|
|
|
|
Install New Transaxle Mount
|
|
|

|
|
|
Don't forget to reinstall the rubber pads on the sides of the mount - the arrows on
the pads point toward the engine. The new mount goes in the reverse manner as the
old one came out. The only thing to be aware of is that you may have to fiddle with
the jack height to get the cross-pin back into place, especially if your old mount
was in bad shape. If you're installing the 3SX Polyurethane mounts, you may also need
a pry bar to coax the engine to move to the correct position to get the cross pin
back in. I found that loosening the four 14mm mounting bolts by 3-4 turns allowed some
play in the mount that made it easier to line up the cross pins. The torque spec
on the 14mm bolts on the mount bracket is 33 ft*lbs. The spec for the cross pin
bolt nut is 51 ft*lbs. After you've got everything
bolted up, lower the jack from under the transaxle and make sure everything's ok.
|
|
|
|
Remove Radiator
|
|
|
Amazingly, this is pretty easy to do on our cars. Remove the upper mounting brackets
by removing the two black 12mm bolts on either side. Drain the radiator and disconnect
the upper and lower radiator hoses by loosening the 10mm bolts on the clamps. Then
disconnect the wiring harnesses for the fans. That's it - you can now just lift the
radiator assembly out of the car.
|
|
|
|
Remove and Replace Front Motor Mount
|
|
|


|
|
|
With the radiator assembly out of the way, the front mount is right in front
of you nose. There's a 14mm cross pin with a nut on one side - remove the
cross pin. Then remove the three 14mm bolts that hold the mount to the
front frame member. That's it - the mount is free to remove now. Note that
if your mounts are in good shape, there should be basically no weight on the
front and rear mounts when the engine is at rest. No jacking or prying necessary.
Note that my old mount (top) had the rubber completely separated from the
mount frame. It was still held in there by the engine bracket, but the rubber
was shot. The new mount goes in just like the old one came out. The torque spec
on the cross pin bolt is 36-43 ft*lbs, and the spec for the mounting bolts is
43-51 ft*lbs.
|
|
|
|
Remove Rear Motor Mount
|
|
|


|
|
|
Ok, this one is the big giant pain in the butt. If you can get this one done,
the others will be a walk in the park. It was almost impossible to get a camera
into some of the spaces you have to work with, so I'll give a verbal description for
most of it. Remove the downpipe - see the
Stillen Downpipe page
if you don't remember how. Now, remove the heat shield from the rear turbo. This
is not very fun. There are numerous 12mm bolts in very inaccessible places. I found
that a ratcheting-type 12mm wrench was almost a necessity. Once the shield is free, you
may find that by bending the lower part of it (accessible from under the car), you can
more easily pull it out from above. Now, you need to unbolt the rear oxygen sensor housing.
This is also a very large pain, but not quite as bad as the heat shield.
You have to loosen the 14mm bolts on the turbine housing and then get the 12mm bolt
on the support bracket near the downpipe connection. You may find that removing the oxygen
sensor may help with accessing the bolts. I also removed the EGR pipe completely (12mm bolts).
At this point, the factory service manual says you can remove the oxygen sensor housing from
the car, but I couldn't figure out how to get it out. It turns out that you don't need to
completely remove it to get the mount out - just move it out of the way. At this point, you can access
all of the bolts for the rear motor mount, but I wasn't able to get the mount out. What I
ended up doing is removing the rear turbo's wastegate actuator (one cotter pin and two 12mm
bolts) to get some extra clearance. I also disconnected both of the heater hoses from the engine
to get some more room, but you may not need to do that. The bolt for the cross pin is
accessible from above, reaching through where the battery was. The nut on the other side is
accessible from below if you have small hands or long fingers. For the four 14mm bolts that hold
the rear mount to the frame member, I used a combination of extensions, universal joints, a
wrench, a socket, and a cheater bar to get at them. See above-pictured contraption.
That actually worked really well, especially with a helper hanging out below then engine
to guide the socket into place as I fed it in from the top. To get the mount out, first rotate
it so that the flat part of the mount is parallel to the firewall. Then slide the whole thing
up to clear the motor mount bracket. At this point, rotate it toward you and maneuver it
through the mess of wires and hoses to get it out.
|
|
|
|
Compare Old and New Mounts
|
|
|


|
|
|
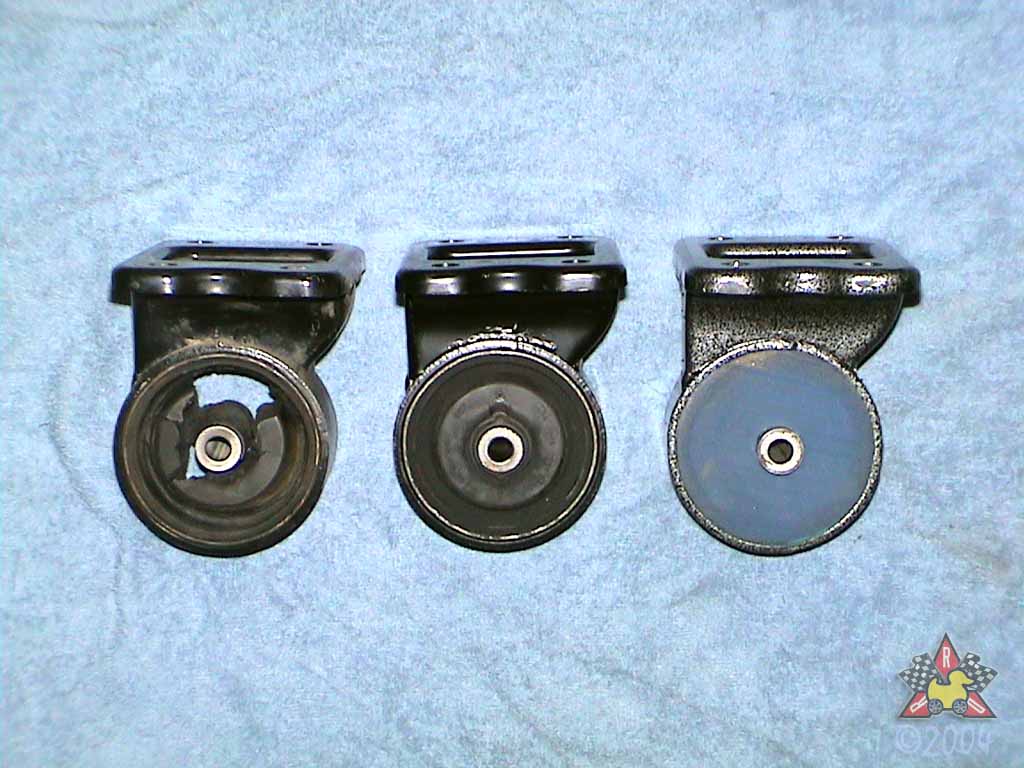
Shown are 3SX (blue), new OEM (center), and old OEM (pieces missing). So here is the source
of my odd vibrations when driving the car. My rear motor mount was so beyond dead that
the cross pin wasn't even attached to the mount anymore. It was free to move about in there
as it wished. All of the rubber pieces in there are pretty much free as well.
That is not a happy mount.
|
|
|
|
Install New Rear Mount
|
|
|


|
|
|
Just like the old one came out. Don't forget to reinstall the heat shield (black helmet-
looking thing) so that the rear turbo doesn't cook your new mount. The torque spec
on the cross pin bolt is 36-43 ft*lbs, and the spec for the mounting bolts is 33 ft*lbs.
Reinstall all of the
exhaust components you removed and button everything back up.
|
|
|
|
Replace Driver's Side Engine Mount
|
|
|


|
|
|
This one is pretty easy. Support the engine so that there is no weight
on the mount. This can be done by using a block of wood under the oil
pan if you're careful. Once there is no weight on the mount, remove the
three 17mm nuts that attach the mount to the engine. Then remove the cross
pin nut on the rear side by using a 17mm closed-end wrench. You may find that
unbolting the cruise control box gives you better clearance. The cross pin
bolt is held in place by two 14mm nuts on the front side - you may want to
remove the intercooler hose to get better access to these nuts. Once the
cross pin bolt is out, the mount just slides upward and out of the engine bay.
The new mount goes right back in the way the old one came out. The torque spec
on the 17mm nuts on the mount bracket is 72-87 ft*lbs. The spec for the cross pin
bolt nut is 51 ft*lbs, and the spec for the 14mm cross pin bolt nuts is 25 ft*lbs.
Also, don't forget the rubber pads that go on the sides of the mount; the arrows
point away from the engine for this one.
|
|